Blog Archives
QMI and MBIM in Python, Javascript…

The libqmi and libmbim libraries are every day getting more popular to control your QMI or MBIM based devices. One of the things I’ve noticed, though, is that lots of users are writing applications in e.g. Python but then running qmicli or mbimcli commands, and parsing the outputs. This approach may work, but there is absolutely no guarantee that the format of the output printed by the command line programs will be kept stable across new releases. And also, the way these operations are performed may be suboptimal (e.g. allocating QMI clients for each operation, instead of reusing them).
Since the new stable libqmi 1.26 and libmbim 1.24 releases, these libraries integrate GObject Introspection support for all their types, and that provides a much better integration within Python applications (or really, any other language supported by GObject Introspection).
The only drawback of using the libraries in this way, if you’re already using and parsing command line interface commands, is that you would need to go deep into how the protocol works in order to use them.
For example, in order to run a DMS Get Capabilities operation, you would need to create a Qmi.Device first, open it, then allocate a Qmi.Client for the DMS service, then run the Qmi.Client.get_capabilities() operation, receive and process the response with Qmi.Client.get_capabilities_finish(), and parse the result with the per-TLV reader method, e.g. output.get_info() to process the Info TLV. Once the client is no longer needed, it would need to be explicitly released before exiting. A full example doing just this is provided in the libqmi sources.
In the case of MBIM operations, there is no need for the extra step of allocating a per-service client, but instead, the user should be more aware of the actual types of messages being transferred, in order to use the correct parsing operations. For example, in order to query device capabilities you would need to create a Mbim.Device first, open it, create a message to query the device capabilities, send the message, receive and process the response, check whether an error is reported, and if it isn’t, fully parse it. A full example doing just this is provided in the libmbim sources.
Of course, all these low level operations can also be done through the qmi-proxy or mbim-proxy, so that ModemManager or other programs can be running at the same time, all sharing access to the same QMI or MBIM ports.
P.S.: not a true Python or GObject Introspection expert here, so please report any issue found or improvements that could be done 😀
And special thanks to Vladimir Podshivalov who is the one that started the hard work of setting everything up in libqmi. Thank you!
Enjoy!
DW5821e firmware update integration in ModemManager and fwupd
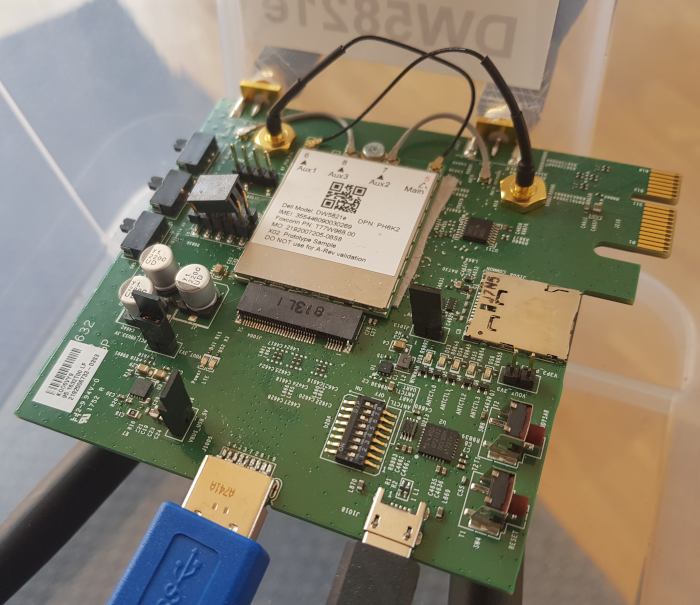
The Dell Wireless 5821e module is a Qualcomm SDX20 based LTE Cat16 device. This modem can work in either MBIM mode or QMI mode, and provides different USB layouts for each of the modes. In Linux kernel based and Windows based systems, the MBIM mode is the default one, because it provides easy integration with the OS (e.g. no additional drivers or connection managers required in Windows) and also provides all the features that QMI provides through QMI over MBIM operations.
The firmware update process of this DW5821e module is integrated in your GNU/Linux distribution, since ModemManager 1.10.0 and fwupd 1.2.6. There is no official firmware released in the LVFS (yet) but the setup is completely ready to be used, just waiting for Dell to publish an initial official firmware release.
The firmware update integration between ModemManager and fwupd involves different steps, which I’ll try to describe here so that it’s clear how to add support for more devices in the future.
1) ModemManager reports expected update methods, firmware version and device IDs
The Firmware interface in the modem object exposed in DBus contains, since MM 1.10, a new UpdateSettings property that provides a bitmask specifying which is the expected firmware update method (or methods) required for a given module, plus a dictionary of key-value entries specifying settings applicable to each of the update methods.
In the case of the DW5821e, two update methods are reported in the bitmask: “fastboot” and “qmi-pdc“, because both are required to have a complete firmware upgrade procedure. “fastboot” would be used to perform the system upgrade by using an OTA update file, and “qmi-pdc” would be used to install the per-carrier configuration files after the system upgrade has been done.
The list of settings provided in the dictionary contain the two mandatory fields required for all devices that support at least one firmware update method: “device-ids” and “version”. These two fields are designed so that fwupd can fully rely on them during its operation:
- The “device-ids” field will include a list of strings providing the device IDs associated to the device, sorted from the most specific to the least specific. These device IDs are the ones that fwupd will use to build the GUIDs required to match a given device to a given firmware package. The DW5821e will expose four different device IDs:
- “USB\VID_413C“: specifying this is a Dell-branded device.
- “USB\VID_413C&PID_81D7“: specifying this is a DW5821e module.
- “USB\VID_413C&PID_81D7&REV_0318“: specifying this is hardware revision 0x318 of the DW5821e module.
- “USB\VID_413C&PID_81D7&REV_0318&CARRIER_VODAFONE“: specifying this is hardware revision 0x318 of the DW5821e module running with a Vodafone-specific carrier configuration.
- The “version” field will include the firmware version string of the module, using the same format as used in the firmware package files used by fwupd. This requirement is obviously very important, because if the format used is different, the simple version string comparison used by fwupd (literally ASCII string comparison) would not work correctly. It is also worth noting that if the carrier configuration is also versioned, the version string should contain not only the version of the system, but also the version of the carrier configuration. The DW5821e will expose a firmware version including both, e.g. “T77W968.F1.1.1.1.1.VF.001” (system version being F1.1.1.1.1 and carrier config version being “VF.001”)
- In addition to the mandatory fields, the dictionary exposed by the DW5821e will also contain a “fastboot-at” field specifying which AT command can be used to switch the module into fastboot download mode.
2) fwupd matches GUIDs and checks available firmware versions
Once fwupd detects a modem in ModemManager that is able to expose the correct UpdateSettings property in the Firmware interface, it will add the device as a known device that may be updated in its own records. The device exposed by fwupd will contain the GUIDs built from the “device-ids” list of strings exposed by ModemManager. E.g. for the “USB\VID_413C&PID_81D7&REV_0318&CARRIER_VODAFONE” device ID, fwupd will use GUID “b595e24b-bebb-531b-abeb-620fa2b44045”.
fwupd will then be able to look for firmware packages (CAB files) available in the LVFS that are associated to any of the GUIDs exposed for the DW5821e.
The CAB files packaged for the LVFS will contain one single firmware OTA file plus one carrier MCFG file for each supported carrier in the give firmware version. The CAB files will also contain one “metainfo.xml” file for each of the supported carriers in the released package, so that per-carrier firmware upgrade paths are available: only firmware updates for the currently used carrier should be considered. E.g. we don’t want users running with the Vodafone carrier config to get notified of upgrades to newer firmware versions that aren’t certified for the Vodafone carrier.
Each of the CAB files with multiple “metainfo.xml” files will therefore be associated to multiple GUID/version pairs. E.g. the same CAB file will be valid for the following GUIDs (using Device ID instead of GUID for a clearer explanation, but really the match is per GUID not per Device ID):
- Device ID “USB\VID_413C&PID_81D7&REV_0318&CARRIER_VODAFONE” providing version “T77W968.F1.2.2.2.2.VF.002”
- Device ID “USB\VID_413C&PID_81D7&REV_0318&CARRIER_TELEFONICA” providing version “T77W968.F1.2.2.2.2.TF.003”
- Device ID “USB\VID_413C&PID_81D7&REV_0318&CARRIER_VERIZON” providing version “T77W968.F1.2.2.2.2.VZ.004”
- … and so on.
Following our example, fwupd will detect our device exposing device ID “USB\VID_413C&PID_81D7&REV_0318&CARRIER_VODAFONE” and version “T77W968.F1.1.1.1.1.VF.001” in ModemManager and will be able to find a CAB file for the same device ID providing a newer version “T77W968.F1.2.2.2.2.VF.002” in the LVFS. The firmware update is possible!
3) fwupd requests device inhibition from ModemManager
In order to perform the firmware upgrade, fwupd requires full control of the modem. Therefore, when the firmware upgrade process starts, fwupd will use the new InhibitDevice(TRUE) method in the Manager DBus interface of ModemManager to request that a specific modem with a specific uid should be inhibited. Once the device is inhibited in ModemManager, it will be disabled and removed from the list of modems in DBus, and no longer used until the inhibition is removed.
The inhibition may be removed by calling InhibitDevice(FALSE) explicitly once the firmware upgrade is finished, and will also be automatically removed if the program that requested the inhibition disappears from the bus.
4) fwupd downloads CAB file from LVFS and performs firmware update
Once the modem is inhibited in ModemManager, fwupd can right away start the firmware update process. In the case of the DW5821e, the firmware update requires two different methods and two different upgrade cycles.
The first step would be to reboot the module into fastboot download mode using the AT command specified by ModemManager in the “at-fastboot” entry of the “UpdateSettings” property dictionary. After running the AT command, the module will reset itself and reboot with a completely different USB layout (and different vid:pid) that fwupd can detect as being the same device as before but in a different working mode. Once the device is in fastboot mode, fwupd will download and install the OTA file using the fastboot protocol, as defined in the “flashfile.xml” file provided in the CAB file:
<parts interface="AP">
  <part operation="flash" partition="ota" filename="T77W968.F1.2.2.2.2.AP.123_ota.bin" MD5="f1adb38b5b0f489c327d71bfb9fdcd12"/>
</parts>
Once the OTA file is completely downloaded and installed, fwupd will trigger a reset of the module also using the fastboot protocol, and the device will boot from scratch on the newly installed firmware version. During this initial boot, the module will report itself running in a “default” configuration not associated to any carrier, because the OTA file update process involves fully removing all installed carrier-specific MCFG files.
The second upgrade cycle performed by fwupd once the modem is detected again involves downloading all carrier-specific MCFG files one by one into the module using the QMI PDC protocol. Once all are downloaded, fwupd will activate the specific carrier configuration that was previously active before the download was started. E.g. if the module was running with the Vodafone-specific carrier configuration before the upgrade, fwupd will select the Vodafone-specific carrier configuration after the upgrade. The module would be reseted one last time using the QMI DMS protocol as a last step of the upgrade procedure.
5) fwupd removes device inhibition from ModemManager
The upgrade logic will finish by removing the device inhibition from ModemManager using InhibitDevice(FALSE) explicitly. At that point, ModemManager would re-detect and re-probe the modem from scratch, which should already be running in the newly installed firmware and with the newly selected carrier configuration.
QMI firmware update with libqmi
 qmi-firmware-update
One of the key reasons to keep using the out-of-tree Sierra GobiNet drivers and GobiAPI was that upgrading firmware in the WWAN modules was supported out of the box, while we didn’t have any way to do so with qmi_wwan in the upstream kernel and libqmi.
I’m glad to say that this is no longer the case; as we already have a new working solution in the aleksander/qmi-firmware-update branch in the upstream libqmi git repository, which will be released in the next major libqmi release. Check it out!
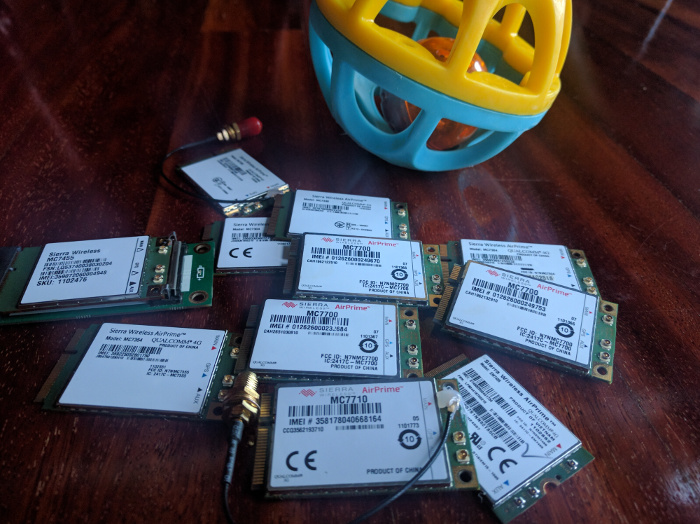
The new tool is named, no surprise, qmi-firmware-update; and allows upgrading firmware for Qualcomm based Sierra Wireless devices (e.g. MC7700, MC7710, MC7304, MC7354, MC7330, MC7444…). I’ve personally not tested any other device or manufacturer yet, so won’t say we support others just yet.
This work wouldn’t have been possible without Bjørn Mork‘s swi-update program, which already contained most of the bits and pieces for the QDL download session management, we all owe him quite some virtual beers. And thanks also to Zodiac Inflight Innovations for sponsoring this work!
Sierra Wireless SWI9200 series (e.g. MC7700, MC7710…)
The upgrade process for Sierra Wireless SWI9200 devices (already flagged as EOL, but still used in thousands of places) is very straightforward:
- Device is rebooted in boot & hold mode (what we call QDL download mode) by running AT!BOOTHOLD in the primary AT port.
- A QDL download session is run to upload the firmware image, which is usually just one single file which contains the base system plus the carrier-specific settings.
- Once the QDL download session is finished, the device is rebooted in normal mode.
The new qmi-firmware-update tool supports all these steps just by running one single command as follows:
$ sudo qmi-firmware-update \
     --update \
     -d 1199:68a2 \
     9999999_9999999_9200_03.05.14.00_00_generic_000.000_001_SPKG_MC.cwe
Sierra Wireless SWI9x15 series (e.g. MC7304, MC7354…)
The upgrade process for Sierra Wireless SWI9x15 devices is a bit more complex, as these devices support and require the QMI DMS Set/Get Firmware Preference commands to initiate the download. The steps would be:
- Decide which firmware version, config version and carrier strings to use. The firmware version is the version of the system itself, the config version is the version of the carrier-specific image, and the carrier string is the identifier of the network operator.
- Using QMI DMS Set Firmware Preference, the new desired firmware version, config version and carrier are specified. When the firmware and config version don’t match the ones currently running in the device, it will reboot itself in boot & hold mode and wait for the new downloads.
- A QDL download session is run to upload each firmware image available. For these kind of devices, two options are given to the users: a pair of .cwe and .nvu images containing the system and carrier images separately, or a consolidated .spk image with both. It’s advised to always use the consolidated .spk image to avoid mismatches between system and config.
- Once the QDL download sessions are finished, the device is rebooted in normal mode.
Again, the new qmi-firmware-update tool supports all these steps just by running one single command as follows:
$ sudo qmi-firmware-update \
     --update \
     -d 1199:68c0 \
 9999999_9902574_SWI9X15C_05.05.66.00_00_GENNA-UMTS_005.028_000-field.spk
This previous commands will analyze each firmware image provided and will extract the firmware version, config version and carrier so that the user doesn’t need to explicitly provide them (although there are also options to do that if needed).
Sierra Wireless SWI9x30 series (e.g. MC7455, MC7430..)
The upgrade process for Sierra Wireless SWI9x30 devices is equivalent to the one used for SWI9x15. One of the main differences, though, is that SWI9x15 devices seem to only allow one pair of modem+pri images (system+config) installed in the system, while the SWI9x30 allows the user to download multiple images and then select them using the QMI DMS List/Select/Delete Stored Image commands.
The SWI9x30 modules may also run in MBIM mode instead of QMI. In this case, the firmware upgrade process is exactly the same as with the SWI9x15 series, but using QMI over MBIM. The qmi-firmware-update program supports this operation with the –device-open-mbim command line argument:
$ sudo qmi-firmware-update \
    --update \
    -d 1199:9071 \
    --device-open-mbim \
    SWI9X30C_02.20.03.00.cwe \
    SWI9X30C_02.20.03.00_Generic_002.017_000.nvu
Notes on device selection
There are multiple ways to select which device is going to be upgraded:
- vid:pid: If there is a single device to upgrade in the system, it usually is easiest to use the -d option to select it by vid:pid (or even just by vid). This is the way used by default in all previous examples, and really the easiest one if you just have one modem available.
- bus:dev: If there are multiple devices to upgrade in the same system, a more restrictive device selection can be achieved with the -s option specifying the USB device bus number plus device number, which is unique per physical device.
- /dev/cdc-wdm: A firmware upgrade operation may also be started by using the –cdc-wdm option (shorter, -w) and specifying a /dev/cdc-wdm device exposed by the module.
- /dev/ttyUSB: If the device is already in boot & hold mode, a QDL download session may be performed directly on the tty specified by the –qdl-serial (shorter, -q) option.
Notes on firmware images
Sierra Wireless provides firmware images for all their SWI9200, SWI9x15 and SWI9x30 modules in their website. Sometimes they do specify “for Linux” (and you would get .cwe, .nvu or .spk images) and sometimes they just provide .exe Windows OS binaries. For the latter, you can just decompress the .exe file e.g. using 7-Zip and get the firmware images that you would use with qmi-firmware-update, e.g.:
 $ 7z x SWI9200M_3.5-Release13-SWI9200X_03.05.29.03.exe
 $ ls *.{cwe,nvu,spk} 2>/dev/null
 9999999_9999999_9200_03.05.29.03_00_generic_000.000_001_SPKG_MC.cwe
[TL;DR?]
qmi-firmware-update now allows upgrading firmware in Sierra Wireless modems using qmi_wwan and libqmi.
